This article provides instructions on installing Cubase Auto-Tune for Icon Upod Pro with how to set up the buttons on the Soundcard to help optimize the sound when singing livestream or recording.
Upod Pro icon is Soundcard livestream singing has 72 available effects with 16bit/48kHz sound quality. Using 12V Adapter, supports phantom power supply for condenser microphone.
Although it belongs to the livestream Soundcard line, it has the ability to combine with Cubase and Auto-Tune software to serve live singing or recording by having the ability to interrupt echo and turn off direct monitor.

Icon Upod Pro offers a quality solution at a reasonable price, a suitable choice for beginners with a cheap price of less than 2 million VND. Below is the sound when combined with the microphone Takstar PC-K200.
I. Set up buttons to install Cubase Auto-Tune for Icon Upod Pro
- Icon Upod Pro requires an included adapter to activate 48V phantom power, this is also its only drawback.
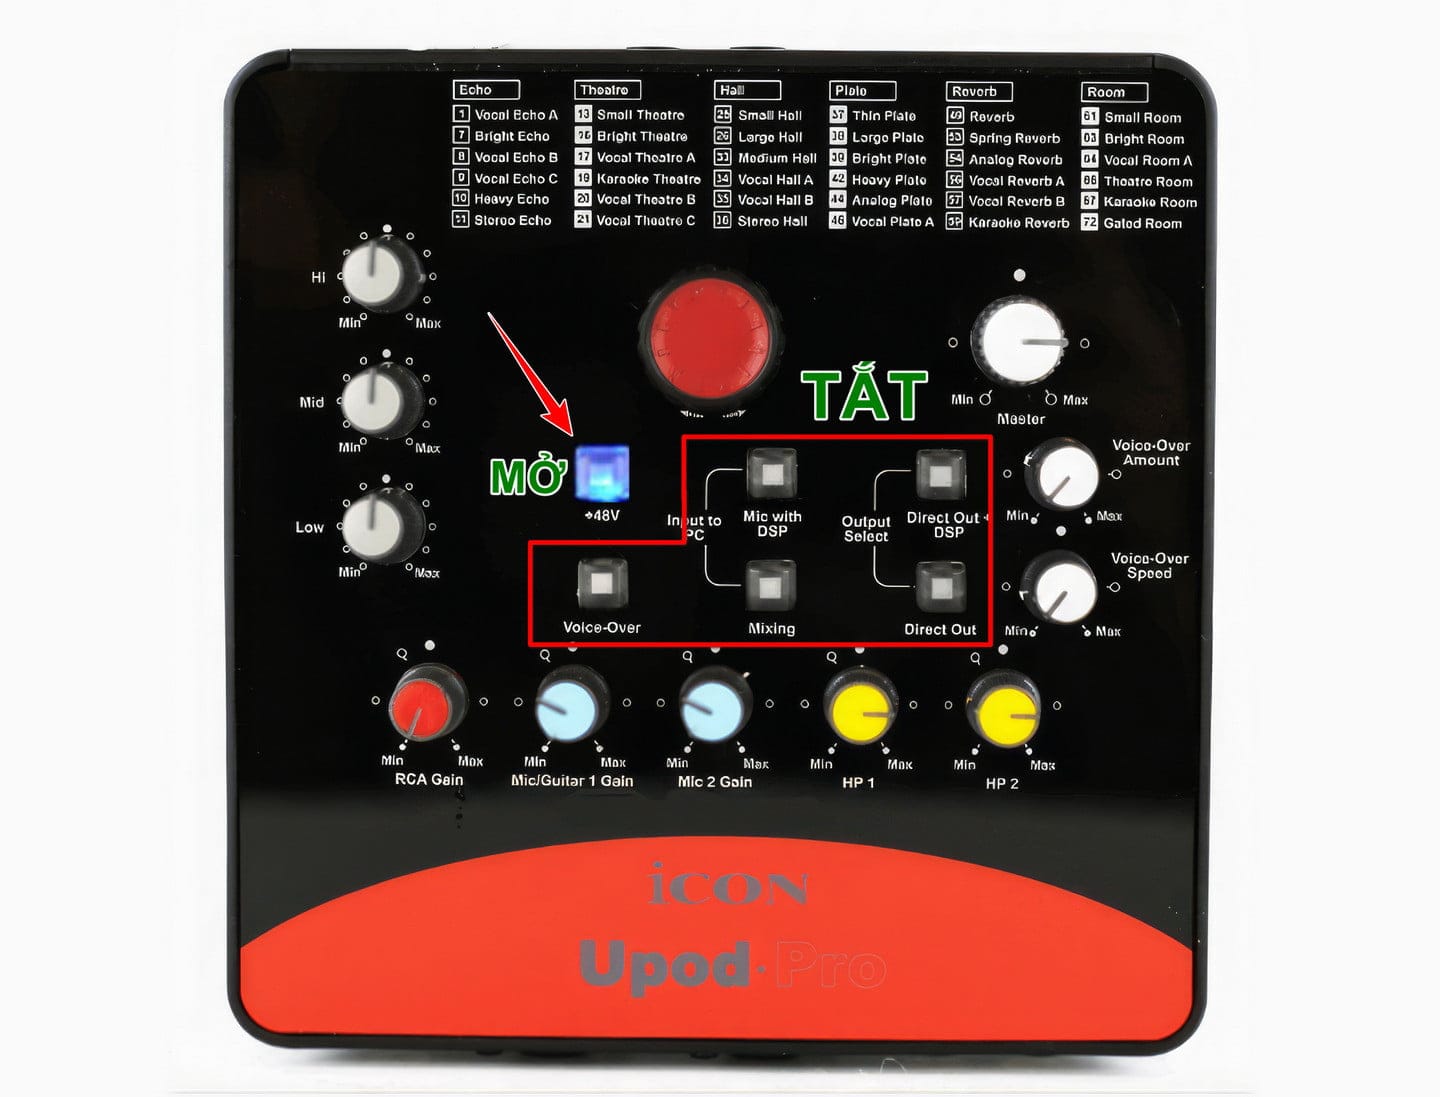
- 3 EQ buttons including Bass, Mid, Treble, you adjust to 12 o’clock (50%) and we will adjust further on Cubase software.
- RCA gain is the input volume when you supply music to the soundcard using the RCA port, in this case we don’t need it so you can adjust it to 0.
- The 2 buttons Gain 1 and Gain 2 are the corresponding volumes of the 2 holes mic 1 and mic 2. Depending on the sensitivity of the mic, adjust it properly, usually I turn it to 10 o’clock (40%).
- HP1 and HP2 are the corresponding volume buttons for headphone jacks 1 and 2. Turn arbitrarily enough to listen, usually about 3 o’clock (75%) is reasonable.
- The 2 Voice Over buttons are not used so I will turn them to 0.
- The Master button is the total volume of the 2 rear Out ports including 1 stereo 3.5mm hole and 2 mono 6.3mm holes. This button can also be set to 3 o’clock or turn it to your liking.
- Finally, there are the buttons, only turn on the 48V button to provide phantom power to the microphone, the remaining 5 buttons are unused so you can turn them all off.

II. Install Cubase Auto-Tune for Icon Upod Pro
1. Install Cubase software
There are quite a few software that can install projects to sing livestream, but the most popular and easiest is still Cubase, you can visit Instructions for installing Cubase to download and install Cubase on your computer.
The article has detailed instructions, you open the Setup.exe file and install it in order from top to bottom and you’re done.
2. Install necessary Plugins
Plugin (English: also known as add-in, addin, add-on , addon, or extension), plugin, or plugin is one or a set of supporting software that helps add specific features to a particular larger application software in our case DAW.
In simple terms, Plugin will help recording software add new features that the manufacturer does not have or does not integrate.
And to run Cubase Auto-Tune for Icon Upod Pro, you need to fully download and install the following plugins:
- The Waves Complete suite with more than 200 plugins, for you to explore.
- Auto-Tune Pro, a famous tool that is making waves making wind makes your voice as smooth as a singer.
3. Download Cubase Auto-Tune project for Icon Upod Pro
Download Free project do On my side, open the project and the software will load all available settings. However, you need to reset the IN/OUT ports by watching the video below:
III. Conclusion
Even though it’s a popular soundcard priced at less than 2 million, the quality, capabilities, and convenience are hard to find with any other soundcard at the same price.
Sound quality does not depend much on the Soundcard but on the microphone, because after all, the soundcard is just a device that transmits and converts sound.
If you have any other questions, please see more at frequently asked questions, or Please refer to installation service if you don’t have time to learn!