In today’s article, I will provide basic instructions on how to live stream and record Studio One 6 on macbook for newbies. The article has a video, if you find it difficult to understand, please watch the video below.
Presonus Studio One 6 is a professional audio recording and editing software. Developed by the company Presonus. Released in 2021, Studio One 6 is the latest in the Studio One lineup.
Studio One 6 offers a range of powerful tools and features to support music production from start to finish. Its user interface is designed to be simple and easy to use, allowing users to focus on creativity without sacrificing operation.
First, we start the software by opening the saved project on the desktop. If you do not have a project, watch the video tutorials or refer to the installation service of NTBlog. Below is the full video, you can watch it through to easily grasp the important information.
I. A brief look at the interface of Studio One 6 on macbook
1. The bottom of Studio One 6 on macbook is the volume control panel, you can hide it by pressing F3 (or Fn + F3) for some models. Or simply click the Mix button in the right corner of the screen.
2. At this panel, there are many volume bars corresponding to the tracks, but you only need to notice the first 2 tracks are BEAT (Youtube music or Beat music that we will insert) and VOICE (vocal track).
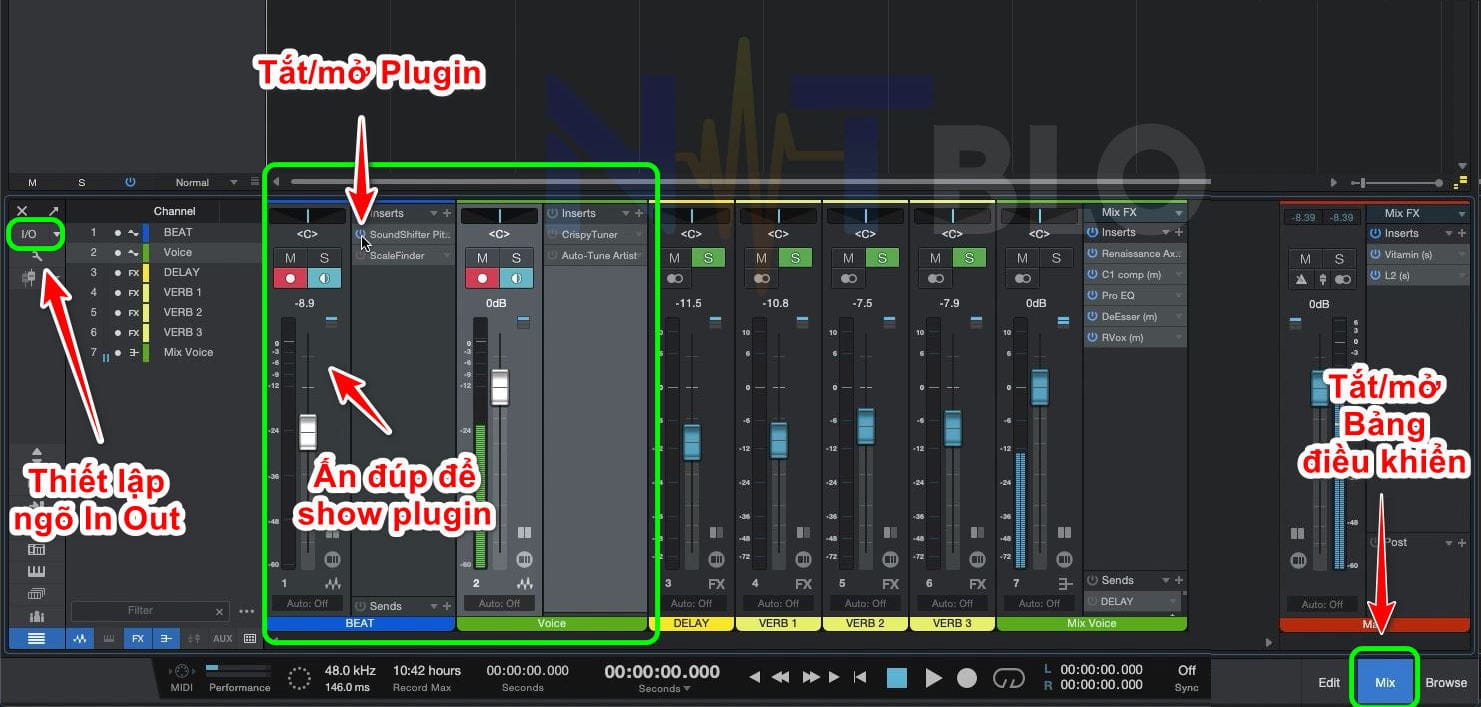
3. In each of these bars can insert plugins, in Small mode the plugins will be hidden, to show we double-click the track we want to show. Before the name of the plugin, there is a power button icon, click to turn it off (use or not use that plugin). To open the plugin interface, we double click on its name.
4. On the left side of the panel you will see the I/O icon (short for Input and Output) where we set up the hardware and inputs for the project.
a. Preference -> Audio Setup: Select hardware to use with Studio One
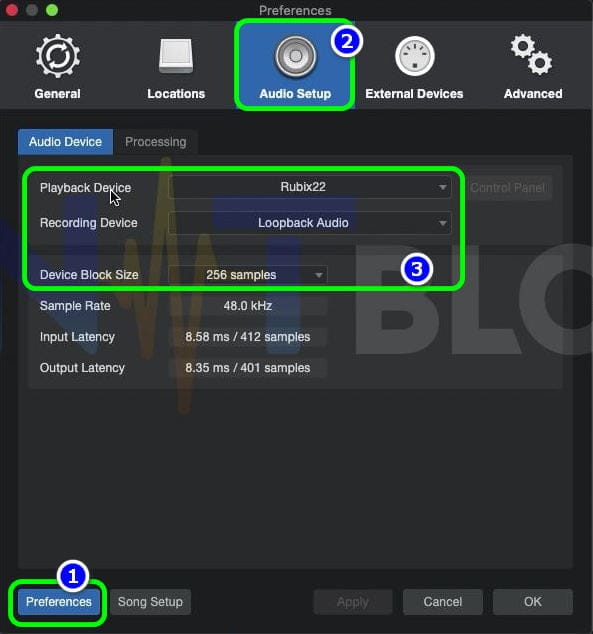
- If singing livestream: Playback Device will select the name of the Soundcard being used, the Recording Device section select Loopback Audio.
- If recording: Playback Device and Recording Device will select the name of the Soundcard being used (Optional, Loopback can be selected for both recording and livestreaming).
- Device Block Size: This can be understood as the bitrate of the audio, usually choose 256 samples to not delay the voice.
b. Song Setup: Select input devices for Input and Output terminals
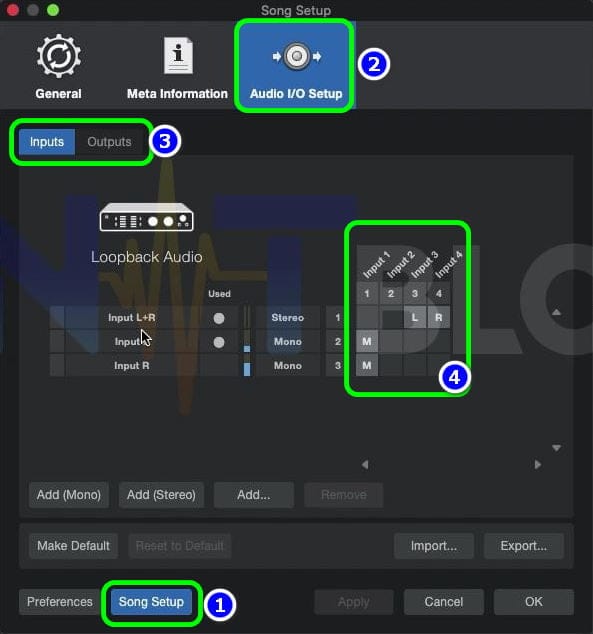
- Tab Inputs: Input L+R (stereo input, select 3-4 if using Loopback to sing live). Input L and Input R (similar to inputs 1 and 2 on the Soundcard).
- Tab Outputs: This is the audio output to your Soundcard. Select it to hear the sound from the software.
II. Raise and lower the tone and tune to sing Studio One 6 livestream on macbook
After showing the plugins of the tracks, you only need to care about the following plugins:
1. Track Beat:
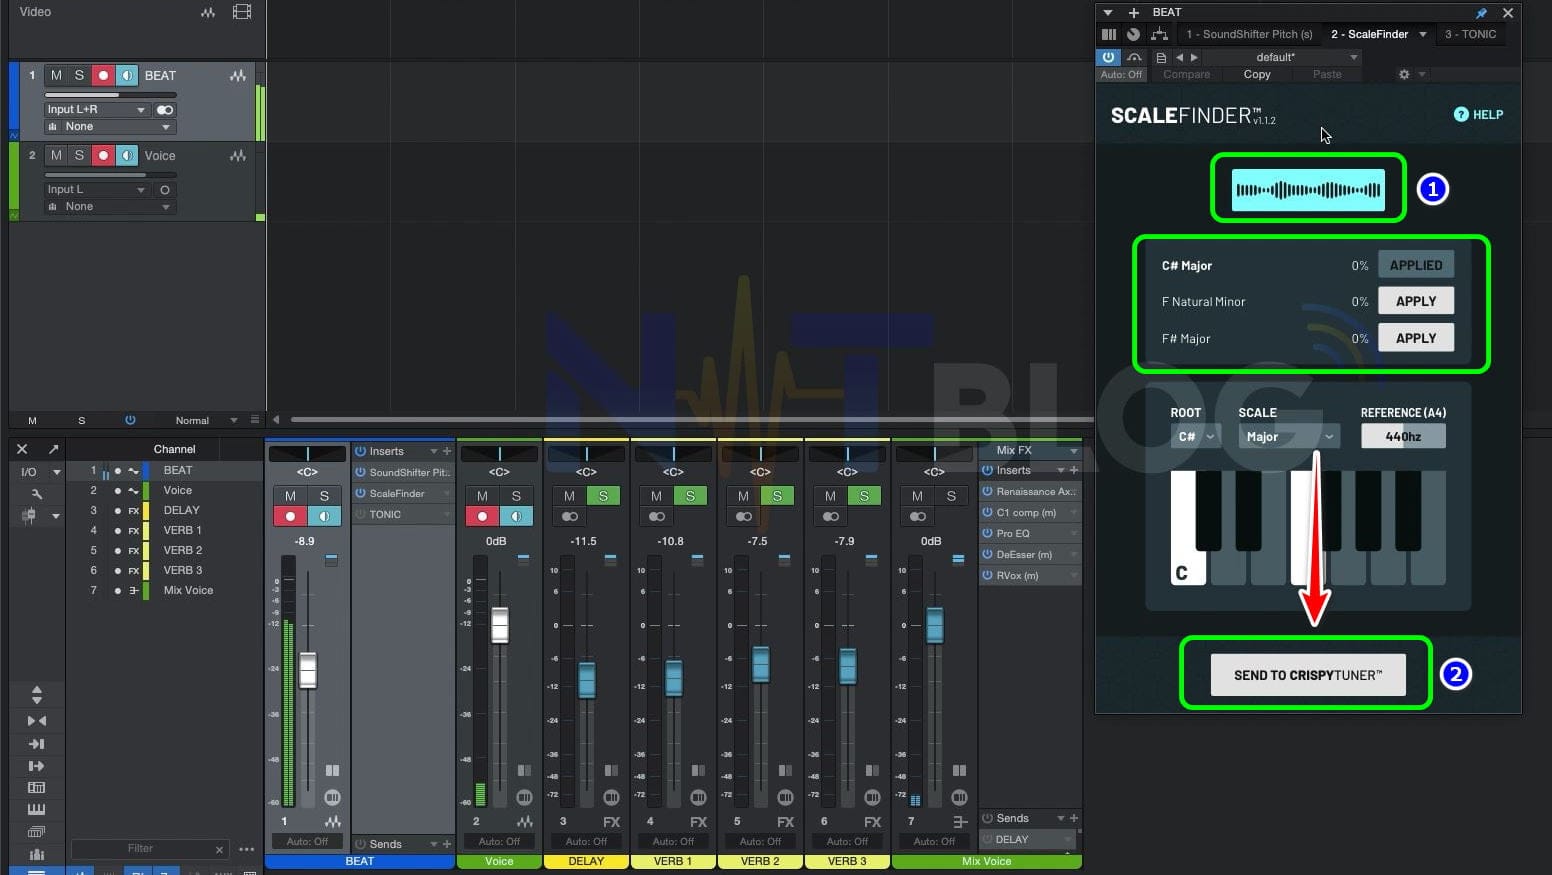
SoundShifter Pitch: Raise and lower the tone of the beat, put the mouse in the Semitone box and scroll up and down to increase or decrease the parameter, each unit corresponds to 1/2 of the music tone. Negative numbers are down, positive numbers are up, 0 is the original tone.
Tone detector plugins: Auto-key, Tonic or Scale Finder. Which plugin to use depends on the installation package you choose. While scanning, it is mandatory to play music (if there is an mp3 file, import it, skip it if you don’t understand).
- Tonic: when changing to another song, press the back and play icon to reset the meter.
- Scale Finder, just press Detect Scale, if using CrispyTuner, press Send to. If you use another tune plugin, you must enter it manually.
2. Track Voice: Just interested in the Tune plugin. As mentioned above, CrispyTunner and Scale Finder are a common set, it recognizes the tone to itself.
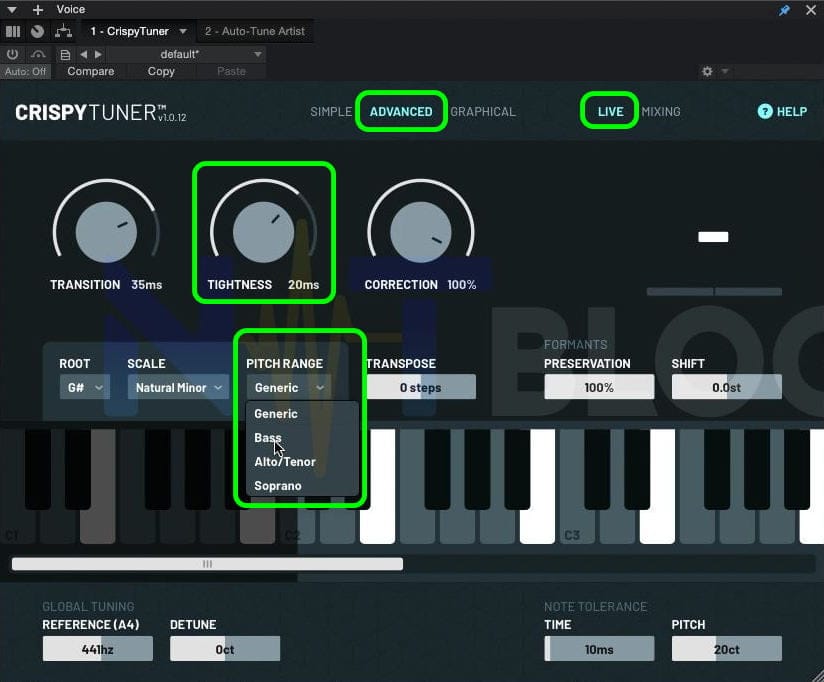
- CrispyTuner: Switch to Advanced to set more parameters. Choose Mixing or Live mode suitable for use. Pitch Range selects Alto/Tenor. The lower the Tighness value, the more tuned the vocals will be.
- WavesTune Real-time: Enter the tone manually, and increase or decrease the Speed parameter to change the plugin’s effect on the vocals.
III. Recording and exporting files with Studio One 6 on macbook
1. Preparations for recording on Studio One 6
- Download beat: You can download mp4 videos from youtube by adding PP after “youtube” in the link. Example YoutubePP.com/watch?v=Eo2hx9MN1KY. You can also use Audio Beats like MP3, WAV…
- Pull Video/Audio into Studio One 6
- If it’s Audio, drag and put it in the beat track
- If it’s Video, drag it to the Video track (Studio One 6 only). To extract audio from a video, drag your mouse over the video’s thumbnail and drag it down to the beat track.
- Turn off plugins: Tune, Delay and Reverb (leave only 1 track verb for easy singing), the purpose is not to distract and have the best recording.
- Go to File menu -> Save to Folder and name it after the song name. The software will save all projects, video and audio files into a folder of the same name for you to easily manage later.
2. Start recording on Studio One 6
- Raise and lower the tone to match the voice, how to change the tone mentioned above.
- Turn off the record and monitor icons on the Beat and Voice tracks, right-click on the Voice track and select Duplicate to duplicate the track, open the record and monitor icons on the newly created Voice 2 track.
- Move the cursor to the desired location. Press the Record button at the bottom of the software (the shortcut is the “*” sign on the numeric keypad).
- First you can sing the whole song, then cut out the parts you don’t like with the Split tool (the shortcut is the number 3 on the top numeric keypad). Or choose how to sing each part, if you like it, drag it to the track above.
- Continue until the song is done.
- Detect the tone according to the instructions above and import or send to the tune plugin. For songs where the chorus changes the tone, split it to its own track and manually enter a tune for it.
3. Adjust Reverb and Delay
- Reopen previously disabled Reverb, Delay and Tune Plugins.
- Use the corresponding volume bars to increase and decrease the Reverd and Delay to suit the song (this depends on each person’s taste).
- Press play to listen again, at the loudest climax, notice if the Master track is Peak, if so, please balance the volume of the beat and voice.
4. Export file
- After you are satisfied with the result, move your mouse up again on the timeline, draw the selection you want to export.
- Select Song -> Export Mixdown (shortcut command + E) to open the Export interface. Choose where to save, name and format the file you want to export, then click OK to Export.
- To listen to the output file again, check and select the output by clicking the Sound icon in the system tray.