Today’s article will help you learn about Photoshop interface and its features including document window, toolbar, options bar, menu bar, panel and workspace.< /p>
There’s a lot we can do with Photoshop, and over the years Photoshop has evolved into a large and professional piece of software.
The interface itself is actually quite simple but in reality, we only know a part. So you should read each part of this article carefully.
This is the first of a series of lessons on self-taught Photoshop me. Let’s get started!
Photoshop interface
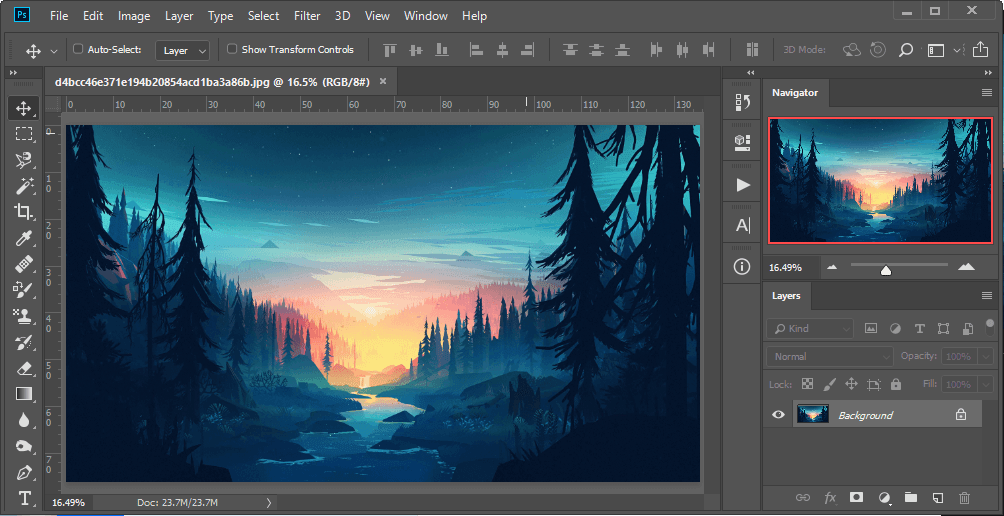
This is what Photoshop looks like when we open an image.
Document Window
The Document window is the large area in the center of the interface where images are displayed.
It’s also where we edit the image. The actual area where the image is visible is called canvas . The surrounding dark area image is pasteboard.
The panel doesn’t really serve any purpose other than filling the empty space around the image when the image is too small to fill the entire Document window
Document Tab
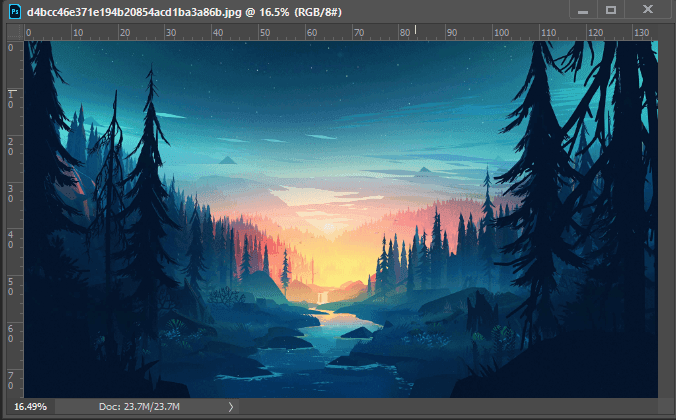
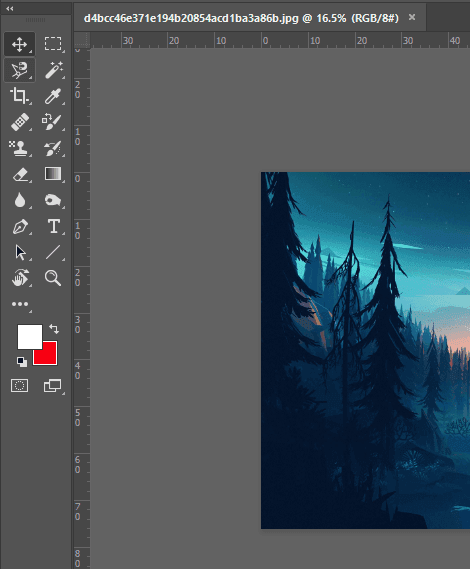
At the top of the Document window is tab Document . Tab displays name and filetype ” of the document (“d4bcc46e371e194b20854acd1ba3a86b.jpeg”) and its current (16.5%).

Tab is also the place for us to switch between Document windows when we have more than one image open in Photoshop.
We’ll learn more about working with multiple documents in another lesson.
Status bar
At the bottom left of the Document window is the Status Bar, we will see more information about the image.
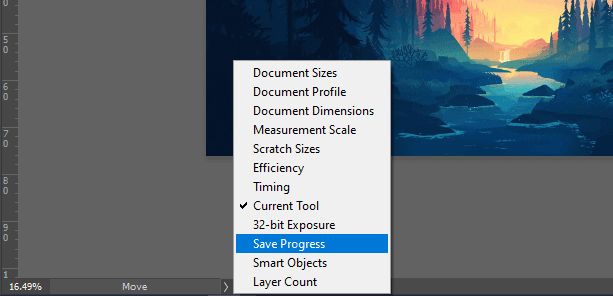
You can select the information you want to display in this status bar by pressing the arrow key next to it.
The status bar shows more information about the image when you click and hold on it.
Tool panel
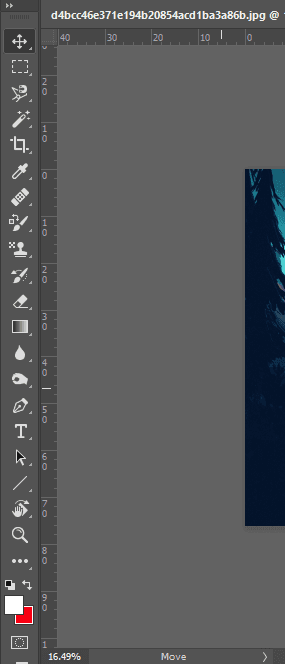
The toolbar (aka the toolbox or Tools panel) is where Photoshop holds all of its tools. You’ll find it along the on the left side of Photoshop’s interface.
There are tools for making selections, for editing images, for drawing, adding types or shapes to your document, and more:
Mở rộng Thanh công cụ (tool panel)
By default, the Toolbar appears as a long toolbar. Clicking double arrow at the top will expand the Toolbar into a double column. shorter. Click the arrow again to return to single column layout:
Hidden Tool Panel
Photoshop includes a lot of tools. Actually, there are more tools than we see.
Most of the tools in the Toolbar have other tools nested in the same place. Click and hold on a tool’s icon to see a menu of other tools hidden behind it.< /p>
To better understand this part, I have a more detailed article at: Overview about the Tool Panel Photoshop toolbar

Option bar
Directly linked to the Toolbar is the Bar options of Photoshop . The options bar shows options for any of the tools we have selected in Toolbar.
You’ll find the Options Bar along the top of the interface, just above the document window.

If I select another tool from the Toolbar, for example Cutting Tool :

Then the properties in the Options Bar change to the properties of Crop Tool:

Menu Bar
At the top of the Photoshop interface is Menu Bar . The Menu Bar is where we find various options and commands, all grouped into categories.

The Menu Bar runs along the top of Photoshop.
Panels
Along the right of Photoshop’s interface is where we find the Panels . Panels give us access to all sorts of commands and options, and have different panels for tasks. different.
The most important panel is Layer (image layers). It’s where we add, remove, and work with layers in our document.
There are also many other Panels, we will slowly learn.
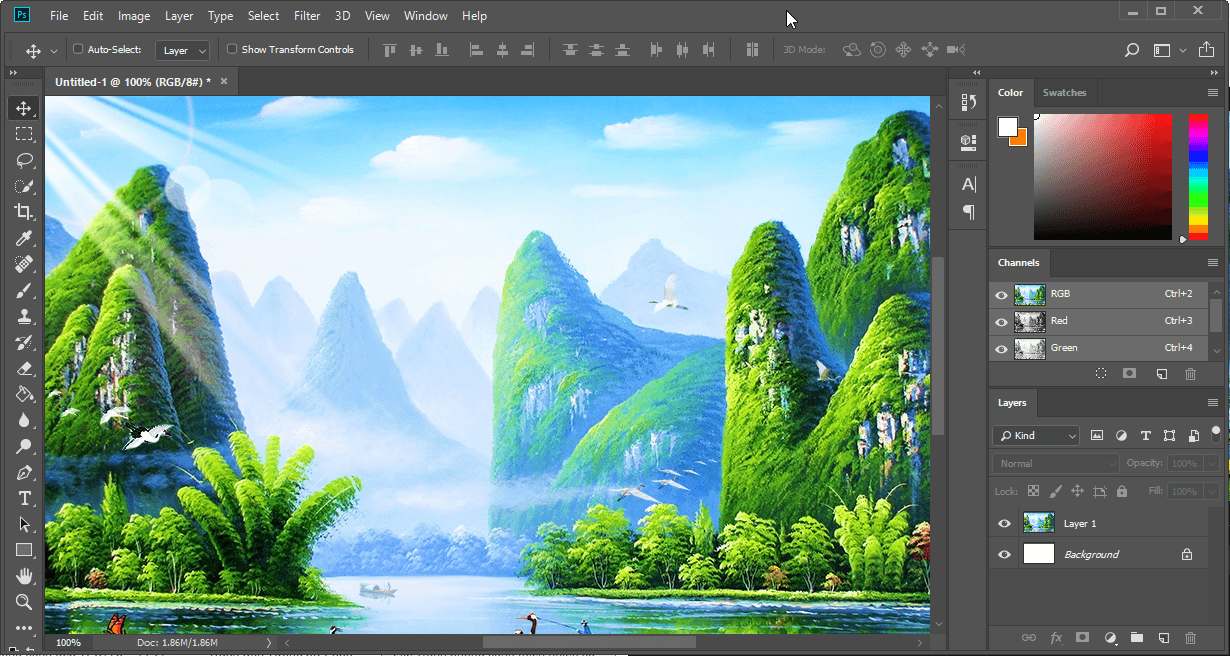
Panels are placed in a vertical column to the right of Photoshop.
Group Panel
To save space on the screen, Panels are tycooned Adobe link together into groups.
Example: let’s look at the Layers panel, each panel has a tab at the top shows the name of the panel. In addition out, there are two other tabs to the right of the Layers tab. This is called the Panel Group.

Switch between Panels in a group
To switch to another panel in a group, click the tab named that panel.

If I don’t see the Panel I need, what should I do?
By default, only some panels are shown initially. But many more available panels are hidden. You will find the full list of Panels in menu Window In Menu Bar:

Tables are listed in a single, long column. I’ve split the column in half here just to help it fit better on the page.
To select a panel, click its name in the list. A tick to the left of the Panel name means the Panel is open. Select it again and the open Panel will be closed.

All Photoshop panels can be accessed from the Window menu.
Search bar
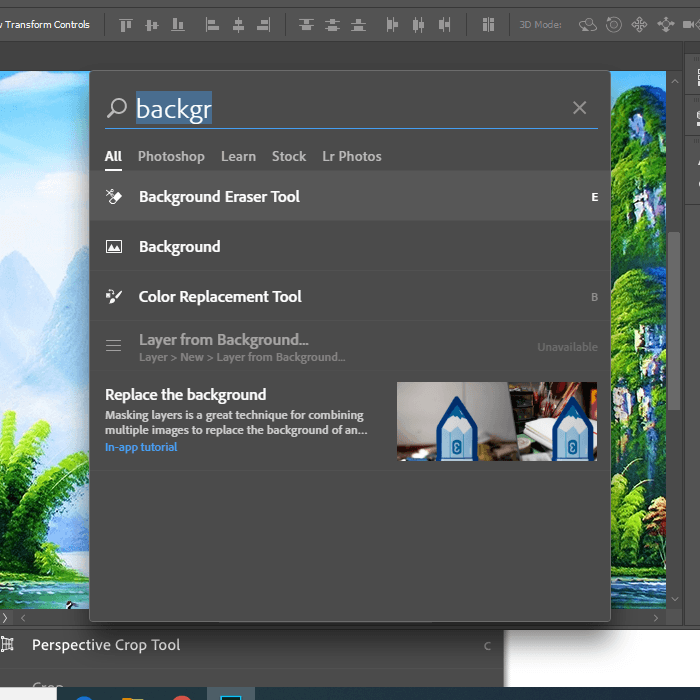
New in Photoshop CC is Search bar . The Search bar allows us to quickly find tools or commands in Photoshop, as well as a guide to tools Various themes or images from Adobe Stock.
To use the Search feature, click Search icon (magnifying glass) in the upper right of Photoshop. You will find it just above the column control panel.
If you’re using Photoshop CC but you don’t see the Search icon, make sure your copy of Photoshop is updated.

Just below your search term at the top is a menu that allows you to filter the results. By default, ALL is selected.
To limit results to only the tools, panels, and commands of Photoshop , select Photoshop .
For instructions on your search terms, select Learn . And to view only images from Adobe Stock, select Stock :
Workspace
Finally, take a look at the workspace. A workspace in Photoshop is a preset and arranged collection of different interface elements .
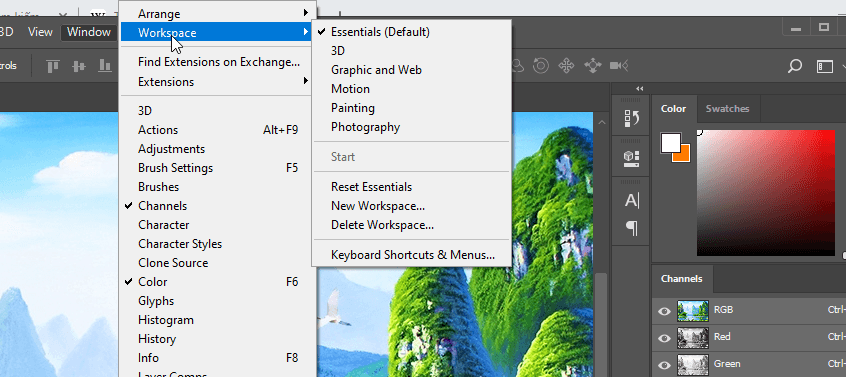
The workspace can control which Photoshop panels are displayed on the screen, along with how those panels are arranged.
A workspace can change the layout of the tools in the Toolbar, the items in the Menu Bar, along with the keyboard shortcuts, can also be customized as part of the workspace.
By default, Photoshop uses a workspace called Essentials . The Essentials workspace is a general, multi-purpose workspace, with interface layout suitable for many different types of tasks.

Workspace Icons in Photoshop CC.
My instructions will choose the Essentials workspace, but I have turned off some unnecessary panels. And I recommend sticking with Essentials when learning Photoshop

Conclusion
End the article learn about the interface of Photoshop here. To learn more about photoshop, please read more Overview of Photoshop Tool Panel
Hopefully the article will be helpful for those of you starting to learn about photoshop, please leave comments or suggestions below. I am willing to absorb and change if necessary.