After a series of brief overviews of shortcuts and basic functions , today I will show you how to create a sparkling logo effect in Illustrator.
For example the logo of Blog Copee:
To do so, you first need to download the following pattern file, which includes a Gold Gradient and texture that makes your logo glow.
Download Link: Here
After downloading, you will get 2 files including “Gold Gradient” to gild the logo and “lap linen” to create a glow effect.

Logo Design
To design a logo, you need to determine the field of activity of that individual or organization. For example, the cosmetic field is usually roses, girl avatars…
If you still don’t know how to design, you can search on google, for example with the keyword “beautiful cosmetic logo”, I found a logo that is quite eye-catching.

However, with a JPG logo like this you will be able to manipulate it directly but have to redraw it like that. If you do not have a talent for drawing (like me), then follow these steps:
Step 1: Create a new file in Illustrator
Step 2: Find and copy the logo you want to use and paste it into the file you just created.
Step 3: Select the image then look up the toolbar above, click the arrow next to Image Trace and choose 6 colors.
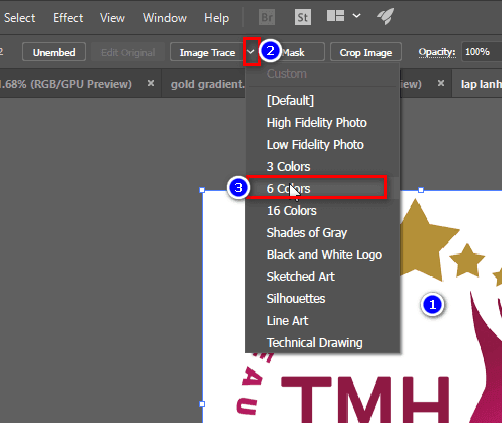
Then you select the Expand button to separate the object into small parts.

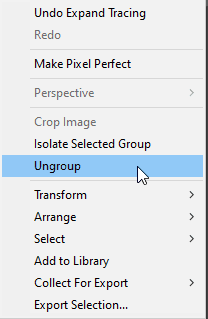
Right click on the image just traced, select Ungroup to break the link between objects.
Now you can separate the background or any extra detail from the main object. Customize the logo to your own style and don’t let it ‘touch’!
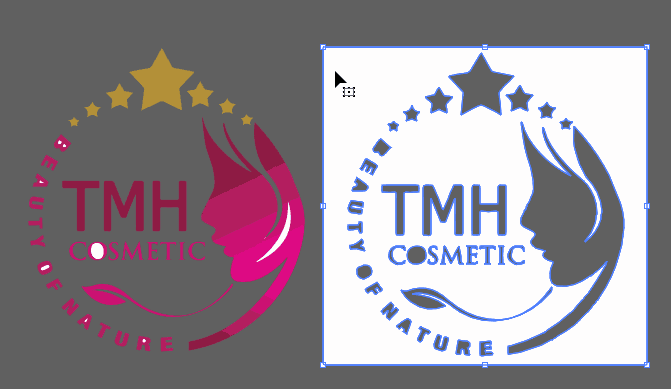
I will do it directly on this logo without editing it because I don’t have time, I hope you understand.
Make the logo dark
For the logo to be gilded and sparkling, of course it must be placed on a dark background, here I use a 2-color Gradient background including #000000 and #242424 as follows:

Next, select the logo and press the key combination Ctrl + Shift + ] and drag the logo to the background.
More: Learn the interface and operations Basics in Illustrator
Click on the background just created and press Ctrl + 2 or Object -> Lock -> Selection to lock the object, the purpose is to make the manipulation process easy.
Golden the logo
Now it’s time to use the Gold Gradient file, after opening it, select all and copy them to the working file and place it next to the logo.

To color a certain detail, select it, select the EyedropperTools tool with the shortcut key I, then click on the Gradient color box that you feel comfortable with, if you don’t like it, you can choose again.
p>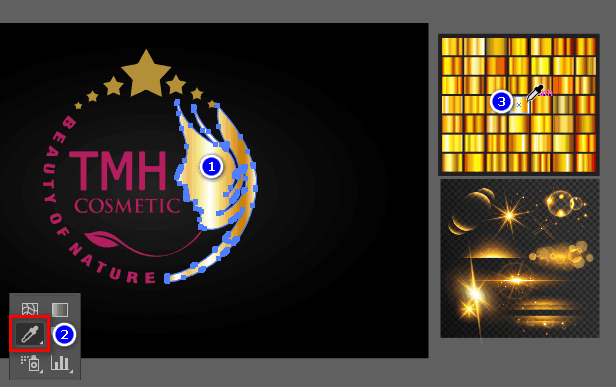
If you don’t like it, you can press the G key and drag a line in the direction you want to get a gradient right.

Continue until your work is complete

However, one important thing is still missing, which is the border. To create a border for an object, left-click on that object and press Ctrl + C, Ctrl + B, respectively.
Continue to use EyedropperTools [I] and select a gradient that you want to border then press Shift X.
You look at the toolbar, now the Stroke property appears, increase the stroke accordingly. Continue until your finished product.

Create logo glow
Time to use the “lap linen” file, you proceed to copy any light streak in this file by holding Alt and dragging it to your logo, then press Ctrl + Shift + ] to bring the streak. this morning to the top.
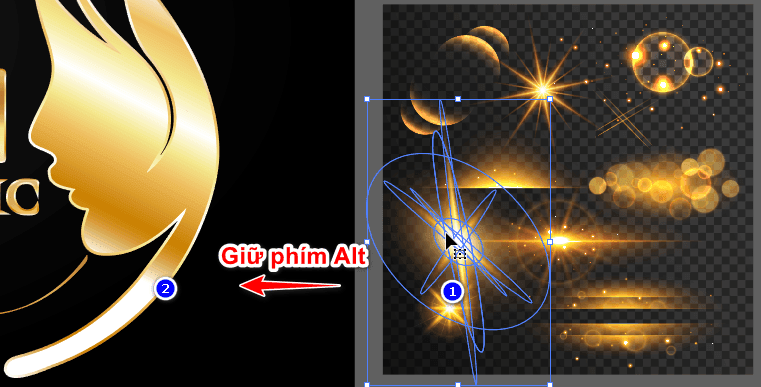
Zoom in, zoom out, rotate and place in any position you want. Continue until you have a perfect work.

End
So you can create a sparkling logo effect in Illustrator, pretty easy, right? Just a few small steps and you have enchanted it to become eye-catching.
Hopefully the article will help you increase your level in the process of self-studying graphics. If you find it interesting, don’t forget to share it with your friends who have the same passion.